How To

Pulling up to that small patch of open land in the middle of the forest can be riveting. You open the car door to the smells of damp Earth, evergreen, perhaps even remnants of a campfire. The sun sparkles through the trees and you think “this is what they mean by the great outdoors”. You may even begin to wonder why you don’t camp more often, until you remember– we have to set up that darned tent.

Setting up a tent can be frustrating. Whether it is your first time spending the night outdoors, you’re introducing your kids to the wilderness, or you are hoping to avoid a fight on that romantic outdoor getaway, we have all the tips to setting a tent without tearing your spirts down.

Woman takes a deep breath in the outdoors to relax
Take a deep breath. Credit: The New York Times
  1. Take a Deep Breath

Look around, remember where you are. Perhaps you are here to reconnect with nature and relax, or are maybe getting a good nights rest before a pack day of oudoor adventures. Either way, this tent is your home for the night. Setting it up can be a headache, but with your goals in mind, the process an go smoothly. Take a deep breath of mountain air and get ready to roll.

Little kid picks up sticks at the campsite
Gather sticks for the fire. Credit: GetOutWithTheKids.com
  1. Delegate

Before even toughing the tent, it might be a good idea to assign roles to everyone in your camping party. Tents rarely require more than two people to assemble so there is no need to over complicate it. If you have little ones running around or extra friends along for the ride, suggest they collect sticks around the campsite to start a fire later or have them unload the car to distract them. Now that it is just you and a partner, or if you are taking on this task solo, you can focus in on what needs to get done.

The items to build a tent include poles and tarp are laid out.
Items for tent assembly laid out. Credit: FreshAirJunky.com
  1. Locate all Items Needed for Tent Assembly

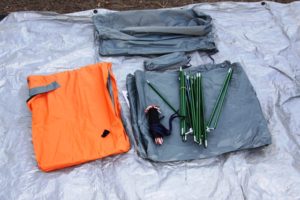
Tents typically include a ground mat, the tent itself, tent poles, a rain tarp, steaks, and instructions. Locate each of these items and lay them out in an easy to access location so you don’t have to scramble for them when you need them. Laying them out beforehand can help eliminate stress when each item needs to go into the tent.

Woman prepares to put a rain tarp over her tent
Putting on the rain tarp. Credit: NC State Parks on YouTube
  1. Get Down to Building

This is where those instructions will come in handy. Read them over once and then keep them nearby for reference. Generally, assembling a tent will involve setting down the ground mat, laying down the tent, inserting the tent polls, attaching the rain tarp, and securing the tent with steaks. However, each tent is unique and may have its own specific requirements. Remember, it is okay to rely on instructions or even a how-to site like WikiHow’s How to Set Up a Tent (With Pictures). When frustration arises, check back in with your instructions to get the job done.

From the inside of the tent you see out into the mountains with a gorgeous sunset.
Relax in your newly set up tent! Credit: Self.com
  1. Celebrate Your Accomplishment

For many of us, setting up a tent is no simple feat. Whether the process went smoothly or had some bumps along the way, don’t forget to pat yourself on the back. If you set the tent up with a partner, thank them for their work. Now that the worst of it is over, you can sit back, roast some marshmallows, and crack open a beer by the fire. Relax, you’re camping now!

How To

The best thing about eggs is that they can be cooked in so many different ways. Sunny-side up, over easy, hard-boiled, the experience is different every time. Right now, things in this world are a bit messy and eggs may not be at the forefront of everyone’s mind.  However, I’m going to show you how we can borrow some of that craziness from outside, and put it to good use in our kitchen. I call this egg recipe: The Pandemic Scramble.

  1. Find Good Eggs

First things first, not all eggs are created equal. I believe that a happier chicken makes a happier egg, so buy those cage-free cartons when you can. There are a lot of cheap eggs out there, but why not treat yourself and spend an extra dollar for an “Eggs-qusite” taste. Think of your egg selection as the people you are choosing to spend your time with during these months. A good egg will crack its shell open for you and allow you to do the same. They have the protein and nutrition to support you during these tough times, and you will in turn protect them from breaking. Covid-19 may have limited the eggs that we have available to us, but just remember that good eggs back home are always a phone call away. I’m sure you can send eggs in the mail nowadays anyway.

Happy Chickens

2. Crack the Shell and Whisk it up

One has to be careful here, after all this is the most delicate part of the whole operation. Use a hard edge to crack the egg and then gently peel away the shell. Pour the yolk into a bowl and make sure none of the shell pieces fall in. Whisk up the eggs until the yolks have all been pierced and the mixture is a homogenous yellow.

Like the eggs, our lives are being scrambled up at the moment, but oftentimes this will reveal our true colors.

3. Slow-Cook

Use a non-stick fry pan because the Pandemic Scramble gets a little messy. Add some butter as a further measure to prevent the eggs from sticking. If you don’t have a non-stick frypan, use even more butter. Once you have a nice golden-brown coating, it is time to pour in your eggs. Immediately set your stovetop as Low as it can go. We want to cook the eggs slowly so we can get that desirable soft and creamy texture. Constantly stir during this process. Every 30 seconds or so, turn the heat up to a 3 or 4, just below medium, and continue to stir. Allow the eggs to cook at this temperature for no more than 10 seconds, then return back to Low. Continue altering between Low and Medium until the eggs begin to solidify.

This is a long process but it is necessary. Perhaps use the extra time to call a friend or family member. I’m sure they’d love to hear from you and learn about the Pandemic Scramble themselves.

After seven or eight minutes your eggs should finish solidifying and look something like this: https://savorysweetlife.com/gordon-ramsay-scrambled-eggs/

Delicious right? At this point in the recipe, you should have already connected with a loved one and made some killer scrambled eggs. Not a bad start to the morning.

4.  Eat Papa, Eat!

Eat Papa, Eat

This is my favorite part of the experience. I personally like to add hot sauce, salt, and pepper but I would never judge anyone for doing otherwise. Hopefully, you have someone to share these eggs with, after all, they took some love to make. It’s important to remember that despite how scrambled our world is right now, the little things can still help makes our days “eggs-tra” special.

Enjoy!

How To

With the pandemic and the election and everything else that 2020 has thrown at us so far, it’s important to remain positive and hopeful. Even though the future is the biggest mystery of all right now, we can still daydream about what we’re going to do when we can be in gatherings of more than 5 people without masks on. One thing I’ve been daydreaming of these past few days is concerts! So, as we prepare for future adventures, here’s a guide to enjoy your first concert fresh out of the pandemic…

Set aside the entire day to have fun!

Although most concerts take place in the middle of the week and most people have work or school commitments, try to see if you can take some time off in the afternoon to prepare for your concert! It’s nice to not have a tight-schedule, and that way you can spend your time getting ready and excited.

Wear something fun!

Part of that prep time should be picking your outfit for the night! Even if you don’t like getting “dressed up,” make sure you wear something you’re comfortable and happy in. I personally enjoy wearing a variety of outfits – ranging from a nice top with sparkly shoes to a unicorn onesie and my old Converse. Artists love looking out into the crowd to see the fans embracing the night with themed costumes and/or coordinated outfits!

Make something!

In a big venue, I would suggest making your own poster with some play on words of your favorite song. In a smaller theatre, you can do the same thing but make it smaller, along the lines of an 8×11 piece of paper. Again, artists love looking out into the crowd to see people really appreciating them and their work, and they want to get to know all of their fans! Even making a sign that says it’s your first show is something that will make the artist so happy to see. Just be mindful of the people around you, so don’t hold it up during the whole show.

Travel lightly, but pack the essentials!

When you’re dancing the night away, you’re not going to want to worry about holding your bag. So, either rock the stylish fanny-pack or keep things in your coat pocket!

In your fanny-pack or pocket, you’ll need a few things. No matter how good your cell’s battery life is, bring an extra charger/power bank. The last thing you want is to be separated from your friends in downtown Denver with a dead phone, so just bring the charger! Also remember your wallet, and preferably bring cash. After having a fantastic night, you’ll probably want a t-shirt or poster to commemorate it all, and some merch booths only take cash.

The most essential item you should have on you seems obvious, but forgetting it happens. You’ll need your ticket! Whether that’s a screenshot of the QR code you received in an email, or a printed copy, your night is going to be cut short if you forget this key element.

Remember to put down the phone!

Yes, you’ll want to take pictures when the artist goes to the side of the stage closest to you. But just remember that those are just pictures, and you’re there for the memories! I usually record one song and take a few pictures, and then simply enjoy the rest of the night.

Now that you’ve learned the basics, you are ready for your first concert post-COVID! So, make sure to wear a mask and maintain social distancing so that this can happen in the near future!

How To

Hopping in the car to travel somewhere new leads to unlimited opportunities to adventure on your own timeline. It allows one to explore and experience the entire journey, adding so many memories to a trip that would have been skipped over if exchanged for a 3 hour long plane ride. Though there are many perks of a road trip,  for a first timer packing a few weeks worth of your life into a car can be a daunting and disorganized task. If you don’t know where to start, follow this guide to packing more efficiently and staying organized your whole trip.

  1. Get shallow clear storage bins. Instead of a suitcase use these; they’re stackable, see through, and organized. Space can get tight when you have multiple people, and weeks worth of stuff for everyone. These bins save space and are easily stacked on top of each other. I specified clear bins because, who remembers exactly where everything is? Being able to see into the bins not only helps you decide what to stack on top of what, but also keeps you from rummaging through a bin only to realize what you were looking for was somewhere else.
  2. Use a jacket as a pillow in the car. When you spend up to 15 hours in the car in a day you better be prepared to spend some of that time sleeping. Bringing something to rest your head on is imperative and will increase the quality of the time you spend on the road. Instead of bringing a pillow which takes up a lot of space and is bound to get dirty because of its inability to be compacted, bring a jacket. This will save space not only in the front seat, but will decrease the amount of stuff you have to shove into those bins.
  3. Figure out what the weather will be like the majority of your trip, and start there. Don’t try to pack for everything, bring a few universal pieces and a couple layers, but avoid packing things that make you think, “I should bring this just in case…”
  4. Bring snacks, and lots of them! When you are 3 hours from the nearest source of food you will be wishing you had something to munch on to pass the time. Depending on how long your drive is going to be, bring a cooler to store things like lunch meat, cheese, veggies, fruit etc. things you wont’t find but will be wishing you had 3 gas stations in.
  5. Fill your water bottle up everywhere you stop. Most days we take for granted how easily it is to refill, when you’re on the road and eating snacks, you will be bummed if you thought half a bottle could get you through the next stint of the drive. Point is, fill it up even if you don’t think you need to, you’ll be happy you did.
How To

Have you ever been on a trip, be it with your family or significant other, and you wanted to wet some lines in a new or exotic area, but didn’t know where to begin?  Well then this is the article for you!  Here are 5 helpful tips for any angler looking to get started in an unfamiliar location.

  1. The Worldwide Web: The easiest way to gain fishing information is with a quick Google search.  While you may not stumble upon any super secret locations, this can be a great place to gain general knowledge about locations as well as flies and tackle.  Specifically look for recent blog posts or regularly updated local fishing reports.  Try to avoid any information that dates back more than a few years as conditions are constantly changing.


  1. Ask a Local: If you have the time, it is always a good idea to consult a local fly or tackle shop before heading out into unfamiliar waters.  Employees of these shops can be a wealth of information regarding local conditions and methods.  The shop may even offer guided trips if that is something you are interested in.  This is also a great one-stop option if you will be needing to purchase tackle or any licenses for the area.  One important thing to remember is that no one wants to give up their favorite fishing hole, or their second favorite… but if you are friendly and make a purchase in the shop to support the business, they may just give up their third favorite.

  1. Google Earth: The creation of google earth has been a game changer in the fishing world ever since its creation.  With this tool it is possible to see clear images of coastlines, structure, and even slightly submerged objects.  Additionally, google earth can provide clear visuals on drop-offs and gradual changes in depth.  While this tool is definitely more helpful for saltwater and lake fishing, this can also be a key tool for scouting out areas of good structure along river systems.  Google earth also gives users the ability to mark and save a location for future reference.  If you don’t already know what you are looking for the google earth option can be a bit confusing; however, if you already have a baseline knowledge of an area this can be a game changer for finding spots.


  1. Nautical Maps and Charts: If you find yourself unable to use the internet, there is always the old fashioned way.  This option relates mostly to marine or inshore fishing; however, this can also be a useful tool in larger lakes.  Nautical charts provide accurate coastline and depth data.  Similar to the google earth option, if you already have a baseline knowledge of methods and tackle for the area, this can be an incredibly helpful tool.  Most nautical charts will also identify reefs, semi-submerged rocks, and shipwrecks which are all great holding areas for many fish species.

  1. Explore: At the end of the day there is no better way to learn how to fish a new area than simply going out and fishing.  Anglers can be very secretive, and no one wants to expose their honey hole.  Though all of the options on this list are helpful tools, it takes time and practice to find the best areas and most effective methods.  That being said, you never know when you might stumble upon your own secret spot.


How To

When preparing for a trip out of the country it is important to know what to pack. It is essential you remember items such as an adaptor for the plug ins, and your passport. These items are you key items but, what else should you plan to bring along with you?

Passport: 

A passport is something that is common knowledge for traveling out of the country. But, keep in mind that passports take awhile to arrive. You want to plan ahead and make sure you order your passport with plenty of time for it to come to you before you leave for your trip.

Adaptor for plug ins: 

The plug ins in Europe are a lot different than the ones in America. They are essential for charging your phone, straighteners, curling irons or blow dryers for your hair, or for anything you may need to charge. It is also important to keep in mind that that you need a dual voltage (110v, 220v). The adaptors will not convert the voltage. The best part about having to purchase these is they are usually very easy to find. They can be found at Best Buy or even easier Amazon. I have added a link in the title “Adaptor for plug ins”. This adapter is great because it has multiple ports for American plug ins and also USB.

Water bottle: 

I know this seems like a dumb item to bring, but it comes in extremely handy. Water abroad can be very expensive especially while going through a museum or going on certain excursions. Having a water bottle handy is going to save you from purchasing expensive water. It also is helpful to have when you are in a location that is not providing water to their guests. Remember that Europe is a lot of walking so you want to be prepared to have water with you at all times. Although it is crucial to bring a water bottle along, it can be a drag to carry around a heavy water bottle. I would suggest bringing a collapsible water bottle. I have linked a cheap collapsible water bottle in the title “Water bottle”.

Comfortable shoes: 

As I said before, you do a lot of walking in Europe. It is extremely smart to remember that while packing. You need to take comfortable shoes that are good for walking long distances. This will save your feet in the long run, and not make your trip miserable.

Portable charger:

Having a portable charger handy is something I would consider a must. With being in a foreign country and not knowing where anything is you use your phone a lot. Not only for being able to find certain places, but also for something as simple as taking pictures. This is also essential just in case there is an emergency, such as getting lost, ordering an Uber, or simply just finding your friends.

Cross body bag: 

A cross body bag is always a great item to have abroad. Some of us love carrying a bag to keep everything we think we may need handy. But, it is a commonly known fact in Europe that bags are often cut off of people and stolen. This is why the cross body part is so important. This makes it a lot harder for something to sneak up behind you and cut it off of your body. I have linked a cute and affordable cross body bag in the title “Cross body bag”.

Exchanging American money for European euro: 

Exchanging your American money for euros is something I recommend doing before you leave. I had a very difficult time doing it in Europe, and ended up having to just use other peoples euros the whole time and give them American money. There do not seem to be many places to this, so it would be smart to do this before going on your trip.


How To

Packing for a trip to Denver can seem overwhelming, especially if you’re going during the “buffer seasons.” This refers to the extreme ups and downs of Colorado weather by the hour, honestly. Especially the few weeks between summer and fall, winter and spring, and spring and summer. Basically anytime the seasons are changing, don’t assume the weather in Denver is…stable.

However, not all hope is lost. As a Colorado native with plenty of experience with bipolar weather, here is some advice on how to pack for your trips to Denver! If you take anything from this, make sure it’s to always pack layers. No matter the time of year or whatever the weather may be, this general month-to-month breakdown should help lighten the load. Well, if you’re packing plenty of layers your load will be much heavier…you know what I mean.

Denver in September

September is usually pretty cold in the mornings and it often warms up in the afternoons. 40-50 degrees in the morning and sometimes at or above 70 degrees by the afternoon. Therefore, layers. Don’t bother packing shorts, but t-shirts are acceptable so long as you have a light sweater to go over it. If you want to be extra prepared, include a snow and/or rain jacket to your suitcase.

October

October is fairly consistent, there might be more chilly days here and there. This is when natives swap their t-shirts for sweaters and Birkenstock’s for Sorels. Again, keep in mind those layers but know that even if the temperatures do rise, there will still be a faint chill in the air. Include hats and gloves to be safe, and you’ll definitely need a heavy jacket this time of year as well. For shoes, either insulated tennis shoes (that you don’t mind getting wet) and/or snow boots!

November

Similar to October, but there will likely be more snow. However, as soon as the snow sticks to the ground, it will probably be gone the next day. As soon as there is snow during the fall in Colorado, the sun is still blazing and it ends up melting away fairly quickly. In case you’ve forgotten already, pack your layers and I’d recommend some hats and gloves and a heavy jacket again, you’ll definitely want your snow boots as well.

December

A total toss-up, there could be blizzards and maybe not. If anything, pack like you would for October and November. The few activities you’re able to do outside will definitely require snow pants and some other heavy-duty snow accessories. Don’t bother much with layering around this time, it will likely be cold most of the day. Not that you’ll need to wear your snow jacket all day, but long sleeves/sweaters and jeans are a must. It’s officially sweater weather!

January

Absolutely freezing, similar to December but this month you may end up wearing a snow jacket all day. The sun peaks through every so often, but not enough to completely melt the snow. Also, the sun sets much sooner so the days seem much shorter and colder. Throw in some movies and hot chocolate into your suitcase, you won’t be doing much outside!

February

February honestly tricks everyone into thinking warmer weather is coming–oh, but just wait for March–so it’s crucial to start thinking about layering again. There is still snow, but there is also a bit more sun. So with that, by the end of February the ground is “sloshy.” There is so much snow melting but it has nowhere to go so it ends up as gross, black slush all over the roads and sidewalks. Be sure to wear waterproof shoes, you still may need those snow boots….

March

March is the worst. For the weather at least. Let’s pack a bag for Denver in March. Now this is important, and I cannot stress this enough, layers. As well as rain boots, rain jacket, long pants, long sleeves, a light sweater/cardigans, hats, gloves, and your sanity. March is cold and wet and sludgy and weird. BUT  the mountains are breathtaking because the mountains are finally visible and they’re still covered in snow. The view is worth the hassle.

April-July

If the weather is every somewhat consistent in Colorado, it’s during the summer. Most days are hot and dry, the forecast is hardly every below 60 degrees and sometimes they reach close to 100. 75-90 degrees is a solid range. The transition from spring to summer may bring some rain, so if you’re staying around that time throw in a rain jacket and an umbrella just in case. Once June is in full swing it is finally time to bring out those shorts, tank tops, and Birkenstock’s again! Be sure to pack those sunglasses and sunscreen too. Denver is the “Mile-High City,” we’re 5,280 feet above sea level, you’re more likely to get a worse sunburn here faster. If you’re prepared for the sun, you’ll be just fine.

Thanks so much for reading, I hope you found some of this information helpful. Enjoy your stay in Denver! Remember, even though the weather may not be consistent, our mountains and dispensaries sure are!


How To

Traveling can be a fun and exciting time, especially when you’re in college. Airports, however, not so much. If you’re reading this, you’re probably preparing for a flight soon. Whether you’re traveling for the weekend or for a longer break, this guide is sure to help you survive the airport as a DU student. 

As always, please be mindful that we are in the middle of a pandemic. Many places have different travel restrictions, so please be sure to check beforehand. Airlines will have different guidelines, but your safety is their priority. Please make sure you’re keeping yourself and others safe by wearing a mask and keeping at least six feet between you and other travelers. 

  1. Check-in: One of the most important steps to remember is to check-in for your flight. Most airlines allow check-in 24 hours before your flight departure time. This step is especially important if you haven’t chosen your seats, since most airlines typically allow seat selection at check-in. If you are flying with an airline such as Southwest, the earlier you check-in, the earlier you get to board your plane. This allows you to find the best seat, and find some good overhead space for your carry-on. 
  2. Baggage: Another important thing to consider is what kind of bags you will be taking with you on your flight. Many airlines offer free carry-ons, but most of them charge for checked bags. If you’re flying economy, airlines like Southwest offer two free checked bags, American offers a free carry-on but Frontier and United only allow a personal item. A personal item is usually the size of a backpack or a briefcase, but sizes vary by airline. You’re able to purchase a carry-on or checked bags with your ticket. Note: If you are not checking a bag, make sure everything in your carry-on or personal item follows TSA guidelines
  3. Preparation: Before you leave, it’s always a good idea to check the weather of whatever place you’re going to. Your pilot will usually let you know upon arrival, but it’s important to know beforehand to make sure you pack accordingly. This is also a good time to decide what you’d like to have with you in the cabin. If it’s an early or a late flight, consider bringing a neck pillow. Remember that airplane air is usually very dry, so an empty water bottle is a smart idea. Another tip is to download airline apps. If you have a smartphone, downloading the app of whatever airline you’re flying with is always a good idea. This way, you’ll have direct access to your flight status, updates, and your electronic tickets. If you’re not checking a bag, having an e-ticket allows you to walk straight to security, since you won’t need a physical boarding plan. Many airlines offer free inflight entertainment, but only through their app. Personally, some of the best movies I’ve watched have been on a flight and they really help time fly. (Get it?) 
  4. Getting there: Whether you’re traveling by yourself or with your family, getting to the airport is another thing you have to think about. In Denver, the RTD can take you all the way to the airport. However, depending on where you get on, it can take a while. If you live on campus, you can get on at the University station, and it can take over an hour to get there. It’s never a bad idea to ask a friend for a ride or to plan to take an Uber. If Uber or Lyft is what you decide to do, remember to schedule your trip early since many times it is hard to find drivers last minute. Also, an Uber from campus costs around $40 which is very pricey, so planning ahead might help you save money. Always remember TSA times vary, so give yourself enough time to make it through security before your flight begins boarding. If you download the MyTSA app, you’re able to check approximate wait times for security at your airport. 
  5. At the Airport: Once you’re at the airport and past security, you’re almost there! Now you can wait at your gate, or if you have time you can walk around and shop. Many airports have gift shops, well-known stores, and restaurants. You can always look up a map specific to the terminal you are currently in and find something fun to do, but if you prefer you can just sit at your gate, relax, and wait for your trip to start.
How To

Boston is a beautiful city all times during the year, but the holiday season brings an extra sparkle to your visit. However, with this comes the cold New England weather.  This is why I decided to compile the top items you should bring for a memorable (and warm!) trip to the Northeast in the winter.

  1. Pack a versatile coat

This one seems obvious, because it is, but it is also very important. A coat will be the item you wear every day, therefore making it a priority in your packing. Bring a coat that is not only warm, but also versatile. Since coats take up a lot of space, it is easier to just pack one. So this one coat should be one that will go with whatever you are wearing and whatever occasion the day brings. This usually yields a neutral coat that can be dressed up or down.

Me pictured in Boston bundled up in my puffy coat.

2. Pack winter accessories

Again, this is a no-brainer, but I draw attention to it because alongside your coat, this is a make it or break it factor of your trip. Who wants to wander around a city absolutely frigid? Not me, and I don’t think you do either. To save your hands and face, I recommend bringing solid gloves and a cozy scarf. Similar to the coat, bring neutrals that will go with the rest of your outfit.

Enjoying a latte inside a coffee shop, while wearing my winter hat.
I decided to leave my hat on while enjoying a latte inside- it was too cozy!

3. Pack a variety of sweaters

From turtlenecks, to crewnecks, to light weight, to sweatshirts, a variety of sweaters will prepare you for the differing temperatures and activities during your time in Boston. I suggest bringing a nicer sweater for if you have a fancier evening planned, light weight sweaters for if the sun is out and you just need a thin layer under your coat, and sweatshirts are great for more casual outings.

I wore a turtleneck under my coat for ultimate warmth on this chilly day.

4. Pack comfortable and thick denim

No matter what you decide to do with your time in Boston, you will want to have at least a couple of reliable pairs of denim. I find denim bottoms are the simplest staples to pack as they can be worn multiple times on your trip. Comfort and thickness is key since it will be cold and you’ll be glad to have your legs warm. Try to bring pairs that are stretchy or not too tight so you will remain comfortable doing whatever the day brings.

A shot taken after grabbing a midday coffee in my most comfortable black jeans!

5. Pack warm and durable shoes

Lastly, don’t forget about your feet! I suggest bringing at least one pair of sneakers and one pair boots. Sneakers are great for your more active days, and boots will be good for a day when you are not walking as much, but may be outside in the inclement weather. Best to be safe and pack both!

A photo of a hilly street in Boston, you will want to be comfortable!
Comfort is key while walking the hills in Boston!

Enjoy your trip to Boston and stay warm!

Informative

The city of Los Angeles is often seen as one of the quintessential California destinations. After all, isn’t it the capitol? (no). But whether you’ve exhausted your Disneyland, Hollywood, and Universal Studios plans, have come to visit family and are now plum out of things to do, or simply said, “Lets go to Los Angeles”, and are now there, you may eventually find yourself with large swaths of time left unfilled. In this event, here is a list of four things you can do in Los Angeles when you haven’t got anything to do in the Los Angeles area.

1. Go to the beach

There is no shortage of beaches in the Los Angeles area, and going to the beach is a great way to waste at least half a day. For more crowded beaches with lots of local amenities, check out Santa Monica Beach, which is near the Santa Monica Beach Boardwalk, as well as many local shops and restaurants. Another option is Venice Beach, where you can spend time in the waves, and on the Venice Beach Boardwalk, which has no shortage of street performers, artists, and wacky side shops, art galleries, and freak shows.

For a more mellow day in the waves, check out Zuma Beach in Malibu where you can see the Hannah Montana House. This is also a popular destination for surfers, so bring your board, or if you don’t surf you can expect plenty of opportunities to cheer them on. Another option is Seal Beach in Long Beach. This is a pretty mellow option, as the beaches are generally pretty empty, and there isn’t much to do except lay in the sun and spend time in the water. However, if you get hungry there are great lunch options- I recommend El Burrito Jr.

2. Go thrift shopping

A great way to spend time in a new city is to check out the thrift stores. Los Angeles thrift stores often run a little pricier than you might find other places, particularly if they cater to more vintage/ designer styles, but if you look in the right places you can find some great stuff for cheap.

There are several good options in one little corner of Hollywood Boulevard. Out of the Closet- Hollywood has some great stuff for low prices, and the profits go to the AIDs Healthcare Foundation. I have found several fantastic art pieces there. If you are looking for something pricier and more vintage, check out Starday Vintage, which is a little shop that sells many fantastic vintage clothes, scarves, and random accessories and items for reasonable prices. Right next door is Vintage on Hollywood, which has a wide selection of stylish pieces that are fun to peruse. However, this is not what could be considered a ‘thrift’ shop by any extent, as a rather boring white t-shirt costs $150, and jackets and coats cost around $500.
However, what better way is there to waste time in Los Angeles then to walk in circles admiring jackets that you can’t even contemplate affording until the clerk peer pressures you to leave with the sheer force of their suspicious stare.

If you don’t fancy a trip to West Hollywood to do your thrifting, I recommend several places in the San Fernando Valley, particularly Throw Back Junction, which has a wide selection of clothes to look at for reasonable prices, as well as some fun accessories and décor.

3. Go to Griffith Park

Griffith Park has no shortage of hiking trails, with magnificent views of the Los Angeles skyline and the Hollywood sign. However, once you have exhausted those, you can also wander about in the Griffith Park neighborhoods, and look at very fancy houses. Once you have exhausted yourself, and your day, make sure to get something to eat at HomeState, which is a small, tex-mex style eatery, with fantastic tacos and queso. To round of the day, you can’t go wrong with a picnic in Barnsdall Art Park near-by.

4. Go to the Aquarium

The Aquarium of the Pacific is a fantastic way to spend your time in Los Angeles. The price of admission is only $17, and then you have free reign to watch sea lions and seals, various types of fish, jelly fish, otters, sharks, kelp, and more. There is a lorikeet pavilion, where for a small price you can feed the lorikeets, and tide pools and touch pools where you can touch rays and sea anemones. Overall, there are precious few ways to get bored wandering around aquariums, and if you find yourself bored here it is also a great opportunity to sort out your priorities. This aquarium also has the added benefit of being right next to the ocean, so you have the opportunity to go find yourself a beach and start this lovely list all over again.